Photo Booth (Part 5): Writing the app
« Hello, photo! »
Overview of Part 5
Part 5 of this series is all about the code, and optimising the performance of our Pi.
Previous steps
If you’ve followed all the previous parts of this series, then so far, you’ll have:
- A Raspberry Pi, running Raspian (or an OS of your choice, as described within Part 2)
- The Pi will also be connected to following components;
- An arcade button, connected across GPIO21 and Ground.
- A camera module (i.e. PiCamera)
- An LED screen
- (Presumably, all of these components will now all be housed in a photo booth enclosure also)
For the remaining steps we can either;
- Connect a mouse and keyboard to the Pi, or
- We can remotely connect to the Raspberry Pi (via the steps described in Part 2).
Connecting to the Pi remotely has the advantage of giving you a larger screen, and is the approach I would recommend.
Downloading the code
As we did in Part 2, open your terminal application on the Pi, and enter the following commands:
mkdir ~/photo-booth
git clone https://github.com/jibbius/raspberry_pi_photo_booth.git ~/photo-booth
The above will create a new directory (/home/pi/photo-booth/), and then download the Raspberry Pi Photo Booth code, for you to use.

Installing prerequisite packages
The code relies upon some additional Python libraries being downloaded also. We can download these from the terminal:
cd ~/photo-booth
python3 -m pip install -r requirements.txt
Getting the code to run
Now that the code has downloaded, we can open up Python and run the Photo Booth code.
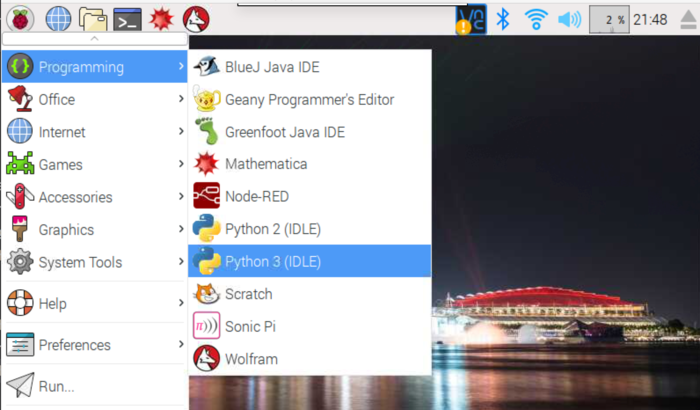
One method of doing this, is opening the Applications menu, and selecting Programming then Python 3 (IDLE).
Note:
- My code is also compatible with
Python 2, butPython 3is currently recommended.

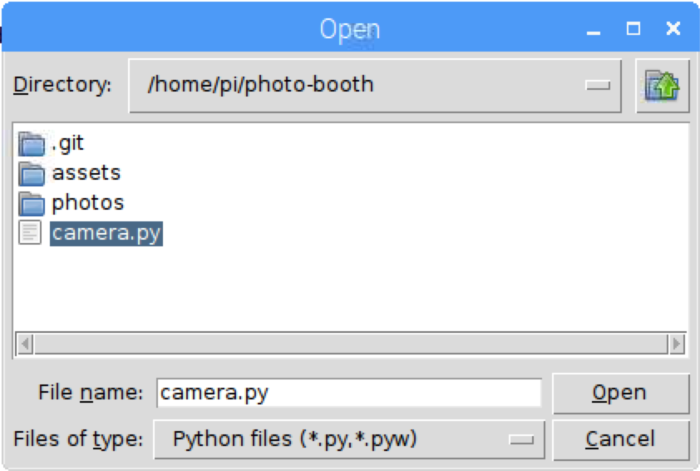
Within the Python GUI, you can then the code we downloaded via File>Open.
Within /home/pi/photo-booth, locate and open camera.py:

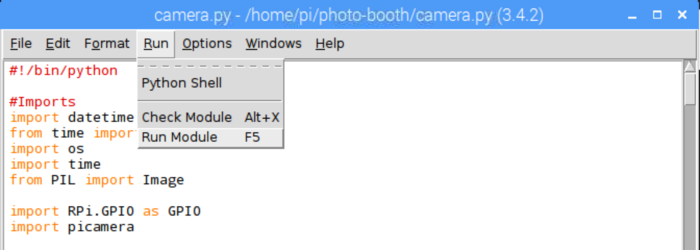
We can then run the code via File>Run Module:

Examining the code
Looking under the hood
In case you are curious, why not have a look at the code within the python file camera.py? I’ll try to explain the various parts as they appear in the file.
We start off with the file header, which tells us that this is an app written in the Python programming language:
#!/bin/pythonThen we have our import statements. These statements used to include some specific Python libraries into our app:
#Imports
import datetime
import os
from time import sleep
from PIL import Image
import picamera
import RPi.GPIO as GPIO
These libraries provide simple mechanisms for dealing with images, timestamps, the Pi’s GPIO pins, and other complex features. This means our code doesn’t need to consider all of the intricacies that are associated with such things, and that saves us a bunch of time.
Configurable options
Further down the file, are a set of variables that will be used by our code:
########################
### Variables Config ###
########################
pin_camera_btn = 21 # pin that the button is attached to
total_pics = 4      # number of pics to be taken
prep_delay = 4      # number of seconds as users prepare to have photo taken
photo_w = 1920      # take photos at this resolution
photo_h = 1152
screen_w = 800      # resolution of the photo booth display
screen_h = 480
Update (April 2018):
- The photo booth is now version 2.
- The Configurable options are now defined within config.yaml instead (otherwise, the behaviour is the same).
You can modify any of the values above to adjust the behaviour of the photo booth.
Additional configuration applies when initialising the camera:
#Setup Camera
camera = picamera.PiCamera()
camera.rotation = 270
Per the above, my camera is mounted with a rotation of 270°, but if your camera is mounted at a different angle then you will need to adjust this value.
The main loop
After defining our configuration options, there is a number of “helper functions” defined. It’s not super important to understand how these work.
Finally, the file defines the main function, which is effectively the “start” of the program.
The first bit loads up some “intro” images, which we alternate between whilst waiting for a user to push the button:
def main():
    """
    Main program loop
    """

    #Start Program
    print("Welcome to the photo booth!")
    print("Press the button to take a photo")

    #Start camera preview
    camera.start_preview(resolution=(screen_w, screen_h))

    #Display intro screen
    intro_image_1 = REAL_PATH + "/assets/intro_1.png"
    intro_image_2 = REAL_PATH + "/assets/intro_2.png"
    overlay_1 = overlay_image(intro_image_1, 0, 3)
    overlay_2 = overlay_image(intro_image_2, 0, 4)

    #Wait for someone to push the button
The logic for alternating between the images looks like this:
    #Amount of cycles to wait, when alternating between each frame
    blink_speed = 5

    #Use falling edge detection to see if button is pushed
    is_pressed = GPIO.wait_for_edge(pin_camera_btn, GPIO.FALLING, timeout=100)

    #Stay inside loop, until button is pressed
    if is_pressed is None:

        i = i+1

        #After every 5 cycles, alternate the overlay
        if i==blink_speed:
            overlay_2.alpha = 255 #make the top image fully visible
        elif i==(2*blink_speed):
            overlay_2.alpha = 0 #make the top image fully transparent
            i=0

        #Regardless of what happens above...
        #...restart the loop, and wait for the button to be pressed;
        continue
Once the button is pressed, we:
- Generate a filename for our images (which is based on the current date + time).
- We are going to take 4 photos, and for each photo there is a “prep for photo” screen.
- Taking all four photos, we display a “playback” animation, of each photo.
- After the playback animation, the app restarts at the beginning (waiting for the button to be pressed again)
    #Button has been pressed!
    filename_prefix = get_base_filename_for_images()

    for photo_number in range(1, total_pics + 1):
        prep_for_photo_screen(photo_number)
        taking_photo(photo_number, filename_prefix)

    #thanks for playing
    playback_screen(filename_prefix)
Further analysis
The photo booth app has more lines of code than makes sense to explore within this blog post. However, if you’ve followed along this far, feel free to explore these functions further.
(And if you’re feeling super excited, perhaps you might even want to code up some additional features of your own?).
Next article
For the next article in this series, I’ll be talking about further optimisations to our Photo Booth’s software, namely:
- Replacing the app’s stock images with your own custom ones,
- Running the photo booth code as soon as the Pi starts up.
Subscribe to my blog to stay informed of my progress.